This is a guide only. There is no free support for this, you should consult Google or an IT expert if you encounter issues with the set up.
How to verify your domain for Google Workspace (email) during initial setup.
This is correct as of June 2022. Google may change their process in future.
This is only if your domain is with us. If your domain is elsewhere, you will need to follow a different approach with your domain registrar
During your setup of Google Workspace, they will ask you about your domain.
Enter your Business Domain Name in the Google Workspace setup.
It will ask you to confirm you want to use this domain to set up your Google Workspace account, if it is correct, press Next.
It will then ask you what you want the prefix for your email to be (e.g. name@ or info@) and also to create a password for your Google Workspace Account.
Once you have completed the initial setup, it will then ask you to activate Gmail for the email address you entered.
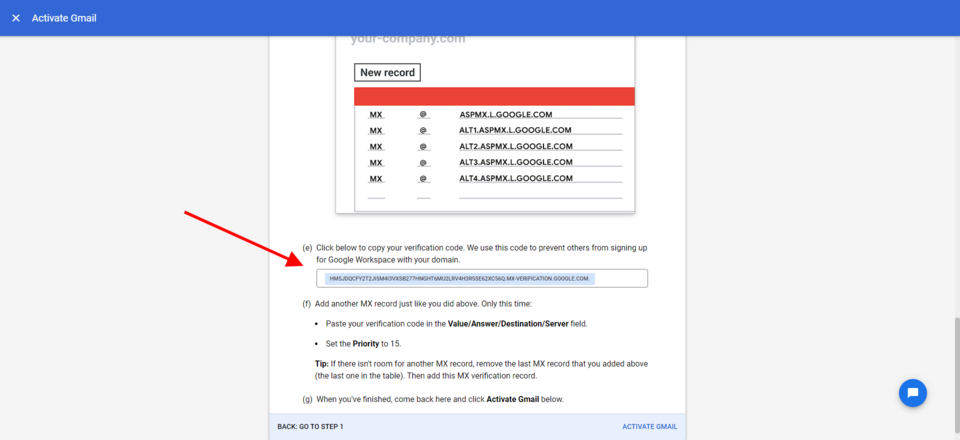
You will come to this Step 1, just go straight to Step 2.

Ignore all first steps in Step 2, just go straight to (e) and copy the verification code.
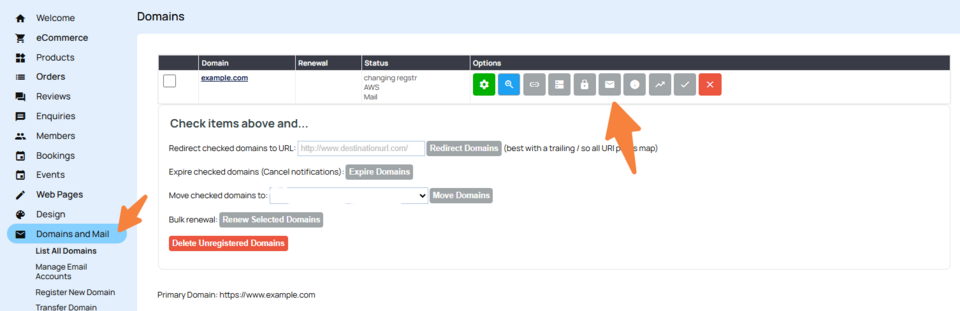
Come back to the CMS. Click on Domains & Mail tab.
Then next to the domain you want to verify click the Email Icon.
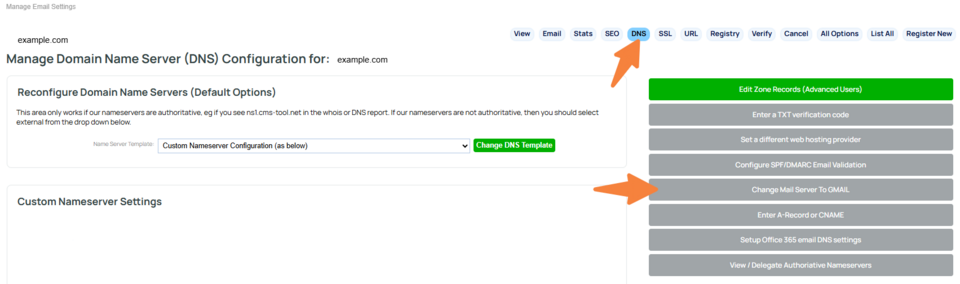
Click on the DNS Tab
Click change mail server to GMAIL
Paste in your code you copied from Google.
Do not change Mail server yet!
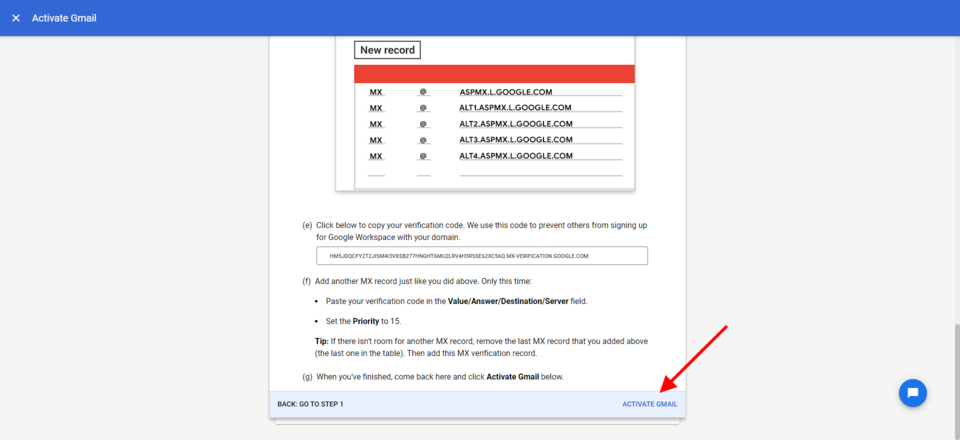
Click Submit DNS Change
Wait an hour, go back to google and activate gmail.

It may take Google up to 48 hours to confirm the verification.
When they have, come back to the CMS and change the Change Mail Server dropdown box to Google Mail MX Settings a save.

Wait for 1 hour, email will start arriving at your Google inbox, some mail may still go to the old location in this time.
Wait for 24-48 hours, by the end of this time, all email should be arriving at the Google inbox.
After 48 hours, if we were previously hosting your email, you can then disable those email settings here.
More From This Section
FAQ Topics
Building your site
- Pages
- Content Editor Modes Explained
- - DRAG DROP Editor (Default)
- - CONTENTBOX Editor (Advanced)
- - WORD STYLE Editor (TinyMCE)
- - LIVE Editor (Click to Edit Mode)
- Styling Content
- Images / Backgrounds
- Banners and Sliders
- Uploading content
- Design Templates
- Forms
- More Q & A
- Menus
- Mobile Styling and Optimisation
Advanced Page Types
E-Commerce
- Shopping Basics
- Product Pricing, Currencies
- Category Management
- Ngā Hua
- Product Options
- Layout and Formatting
- Ngā Kōwhiringa Utu
- Freight - Couriers
- Processing Orders
- Orders / Invoices
- Advanced Ecommerce
- Plugins
- Wholesale
- Bookings Management System
- Stock & Quantities
- Vouchers, Discounts, Loyalty Points
- Selling Photos / Prints
- Shopping Cart Add-on Page types
- Advanced APIs / Add ons
- Te Wāhi Hoko (POS)
- Reports
Email & Membership
- Member Management
- Members Pages / Template Customisations
- From Addresses and Reply To Email Notifications
- Global Enquiry form options
- Standard Field Names
- Webmail
- Bulk Email
- CRM Features
- Email Campaigns
- Forums & Blogs
- Pop3/Imap Email Services
- Scams and Hoaxes
- Lead Magnets / Growing Your Customer Database
Promoting your site
Advanced
- Power User Options
- Form Spam Filtering
- Wordpress
- PHP Setup
- [TAGS]
- jQuery snippets
- Search External Links / Import external content
- HTML / CSS Snippets
- Embedding Web Fonts
- Loading additional Material Symbols styles
- FAQ Help Map
- Uploading local font files
- Advanced Template Customisation, CSS, etc
- Languages and Translations
- Importing Content from Another Platform