You can reduce the size of any snippet block from the default 100% available width to a custom width, and align center, left, right either by drag-drop or by settings in the Style Editor popup.
Resizing Rows by drag-drop
- Click the required snippet block to highlight it
- Click and drag the blue handle that appears on the right side of the snippet to the max-width required
- Once completed, drag the snippet using the green 4-way arrow icon that shows top left of the snippet block.
Resizing Rows by Style Editor popup
You can set a specific width for your snippet block by setting the max-width value in the Style Editor Popup. To access the Style Editor, click the red COG icon that shows top-left above the snippet block.

1. Click the red COG icon to launch the Style Editor

2. Choose a value from the MAX WIDTH setting.

3. Once set an alignment option will appear allowing you to set the horizontal alignment.
Resizing Columns by dragging the Column edge.
You can resize a column by hovering near the edge of the column to bring up a drag-resize cursor.
Dragging horizontally with this cursor will increase or decrease the size of the column, changing the size of the column next to it to fit.

Choosing a column and direction to expand.

Column sizing after resize.
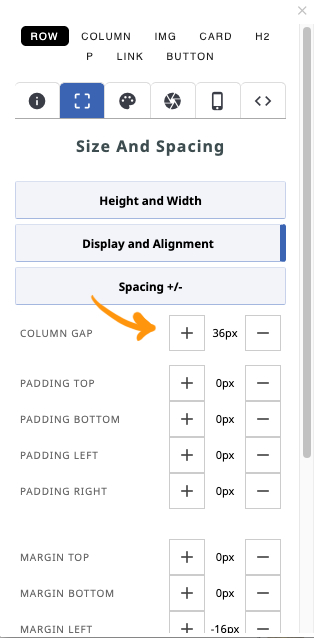
Adding spacing between Columns with Column Gap
You can add spacing between each Column without changing the Columns padding settings via the COLUMN GAP setting property.
The Column Gap Setting can be found in the SIZE AND SPACING tab when editing the row element.
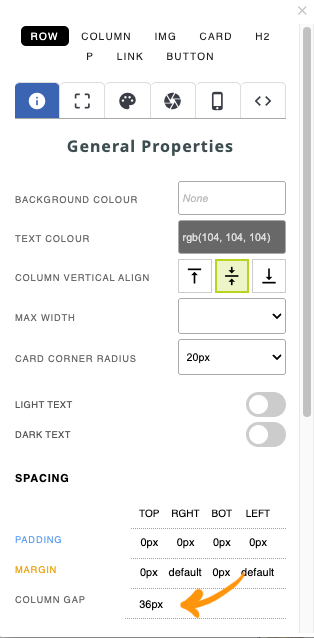
You can also get there from the main Style Editor screen by clicking the current Column Gap value e.g. 36px in the screen to the right.
FAQ Topics
Building your site
Advanced Page Types
E-Commerce
- Shopping Basics
- Product Pricing, Currencies
- Category Management
- Products
- Product Options
- Layout and Formatting
- Payment Options
- Freight - Couriers
- Processing Orders
- Orders / Invoices
- Advanced Ecommerce
- Plugins
- Wholesale
- Bookings Management System
- Stock & Quantities
- Vouchers, Discounts, Loyalty Points
- Selling Photos / Prints
- Shopping Cart Add-on Page types
- Advanced APIs / Add ons
- Point of Sale (POS)
- Reports
Email & Membership
Promoting your site
Advanced
- Power User Options
- Form Spam Filtering
- Wordpress
- PHP Setup
- [TAGS]
- jQuery snippets
- Search External Links / Import external content
- HTML / CSS Snippets
- Embedding Web Fonts
- Loading additional Material Symbols styles
- FAQ Help Map
- Uploading local font files
- Advanced Template Customisation, CSS, etc
- Languages and Translations
- Importing Content from Another Platform